How To Sync Notion Pages With Webflow CMS Without Copy And Paste

Write in Notion. Publish in Webflow. No more copy and paste.
If your content team drafts in Notion and your site runs on Webflow, manual transfers eat time, break formatting, and introduce mistakes. In this guide, you’ll learn how to sync Notion pages with Webflow CMS automatically using SyncFlow — a powerful, no-code bridge that maps your Notion databases to Webflow Collections and keeps them in perfect alignment. You’ll set it up once and then publish from Notion with one click (or even fully automatically).
Try SyncFlow — Notion-Webflow Sync

Why sync Notion to Webflow CMS (and stop copying and pasting)
- Consistent formatting: Preserve headings, lists, images, code blocks, and even math expressions.
- Speed and accuracy: Publish updates in seconds without double work or human errors.
- Structured content: Map Notion properties to Webflow fields for SEO-friendly, clean entries.
- Scales with your team: Writers stay in Notion; designers and developers maintain Webflow classes and layouts.
Meet SyncFlow — Notion-Webflow Sync
SyncFlow connects your Notion database to a Webflow CMS Collection in just a few clicks. It supports auto-sync, auto-publish, code highlighting, TeX rendering, and flexible styling choices, giving you full control over how content looks and behaves.
Core capabilities you’ll use today
- Auto-Sync: When a Notion page changes, it syncs to Webflow automatically.
- Auto-Publish: Ship changes live without touching the Designer.
- Versatile Field Types: Text, images, checkboxes, dates, URLs, and more.
- Fully Customizable Styling: Import inline styles or map to Webflow classes you control.
- Page Linking: Internal Notion links become working links between Webflow posts.
- Code Highlighting + TeX: Technical and academic posts stay perfectly readable.
How to sync Notion pages with Webflow CMS (step-by-step)
Follow these steps and you’ll have an automated Notion → Webflow pipeline running in minutes.
1) Visit the site and get started
- Go to https://syncflow.ybouane.com/ and click Get Started.
2) Grant access
- Approve access to your Webflow sites so SyncFlow can read/write your CMS collections.
3) Create your SyncFlow account
- Sign up or log in. This connects the app with your workspace.
4) Launch the app in Webflow Designer
- Open your Webflow project and start the SyncFlow app from inside the Designer.
5) Connect to Notion
- In SyncFlow, click Connect Notion and select the Notion page or folder for your content.
6) Create a new sync task
- Click “Sync a new database” to begin linking one Notion database to one Webflow Collection.
7) Choose your Webflow CMS Collection
- Select the target Collection (e.g., Blog Posts). This is where your Notion pages will land.
8) Pick or create your Notion database
- Choose an existing Notion database or let SyncFlow generate one with matching fields.
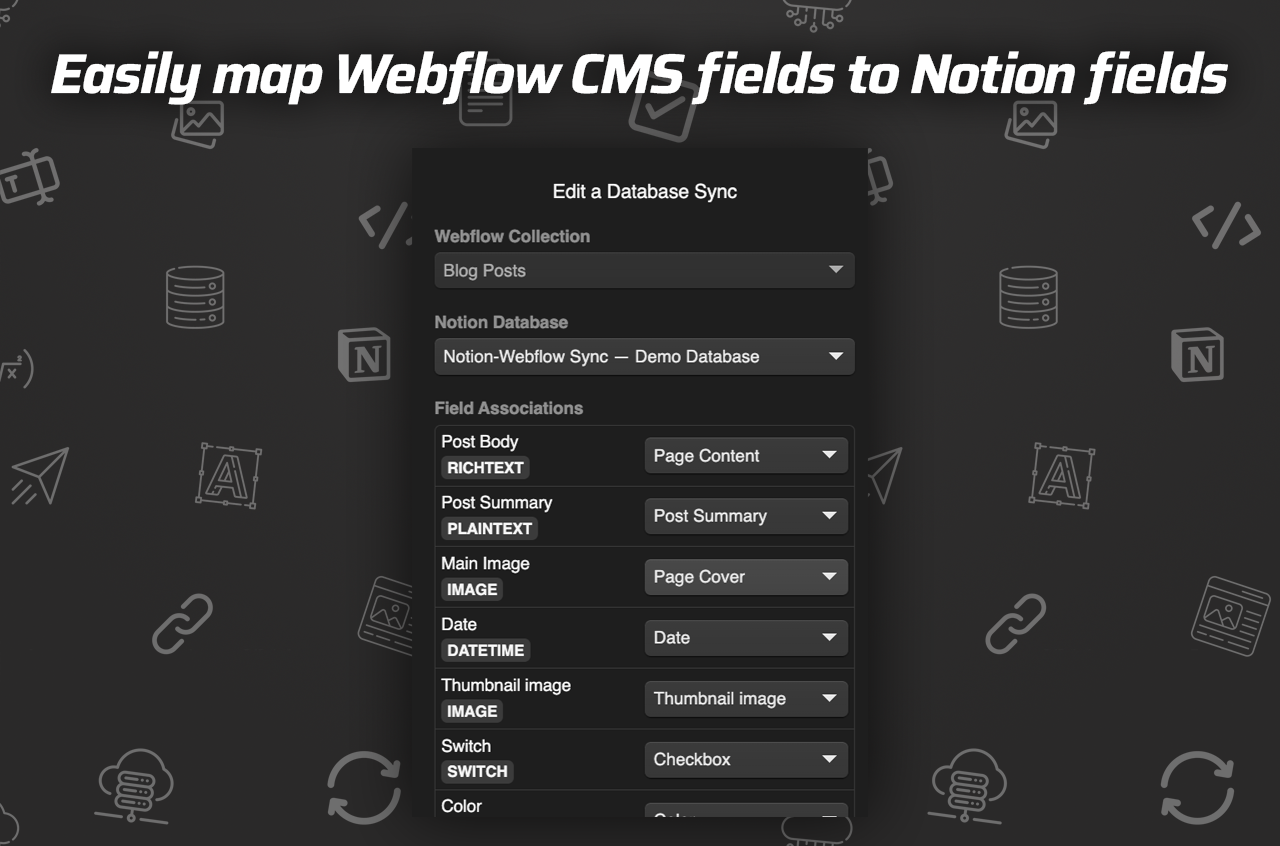
9) Map fields
- Map Notion properties to Webflow fields (Name → Name, Cover → Main Image, Tags → Categories, etc.).
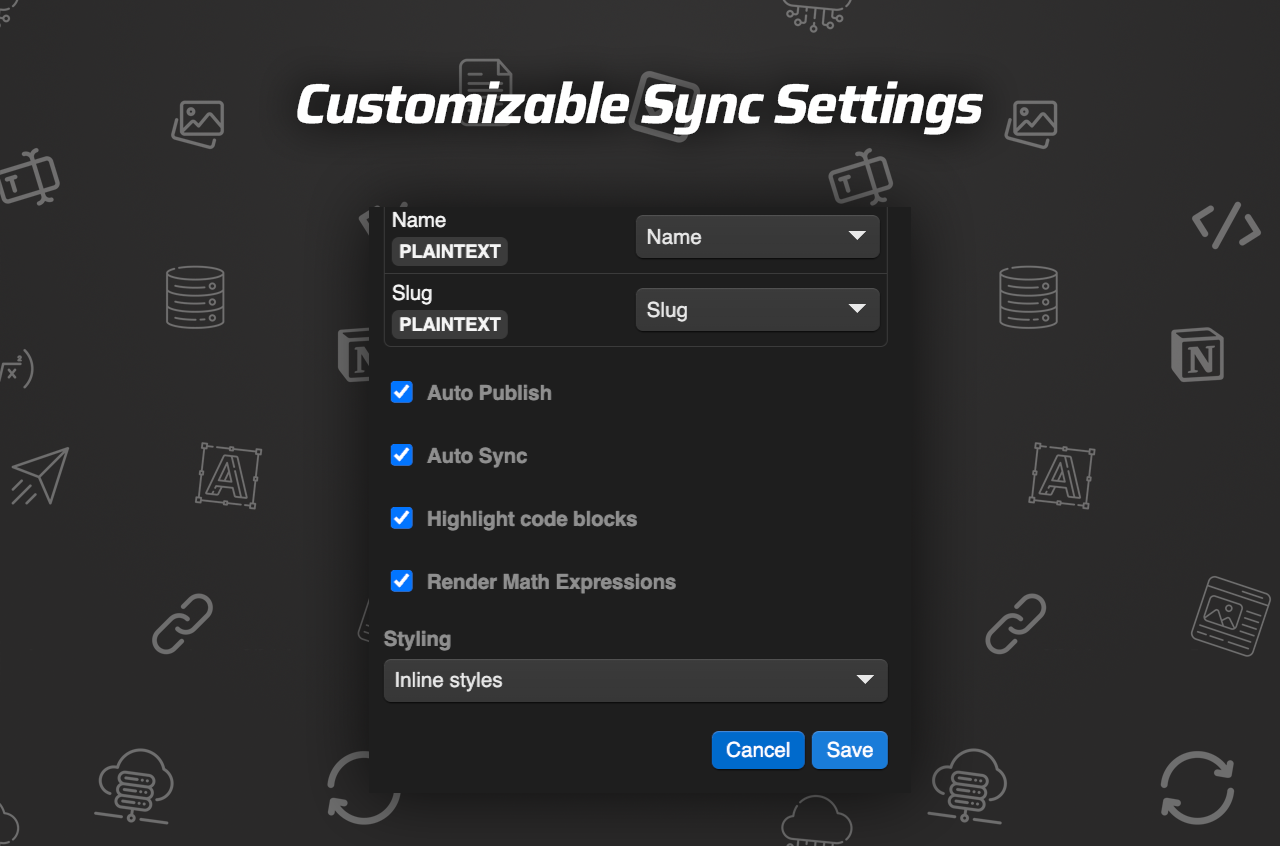
10) Adjust sync settings
- Turn on Auto-Sync and Auto-Publish if you want fully hands-off updates.
- Enable code block highlighting and TeX rendering if you publish technical or academic content.
- Choose Inline Styles (fastest path) or Use Classes (maximum design control in Webflow).
11) Save settings and verify
- Save your configuration. Add a test entry in Notion and watch it appear in your Webflow Collection within minutes.
Pro tips for a flawless Notion → Webflow workflow
- Use Classes for consistency: If you have a design system in Webflow, select “Use Classes” so imported elements inherit your site’s typography and spacing.
- Structure your Notion database: Add properties for slug, summary/excerpt, cover image, tags, author, publish date. The more structured your Notion is, the cleaner your CMS entries.
- Optimize for SEO at the source: Put your target keyword in the Notion title; add meta description, alt text fields, and canonical URL if needed.
- Lean on Auto-Publish for speed: For trusted editors, Auto-Publish turns Notion updates into live posts automatically.
- Use Page Linking: When you link related Notion pages, SyncFlow converts them into proper internal links between Webflow posts, boosting UX and SEO.
Troubleshooting and FAQs
- My content didn’t appear in Webflow.
- Check that the Notion page is in the connected database and has the right status (e.g., “Published”). Confirm the sync task is enabled.
- Formatting looks different.
- Switch from Inline Styles to Use Classes, then map classes to your Webflow typography and containers for full control.
- Images aren’t coming through.
- Ensure images are embedded in Notion blocks (not pasted as links only) and that the database has an image property mapped to a Webflow image field.
- Can I resync everything?
- Yes. Use the Full Resync option in SyncFlow to align an existing Webflow Collection with your Notion database.
Pricing
SyncFlow’s Standard plan is just $8/month and includes:
- 1 Webflow Site Install
- Unlimited Syncs
- Unlimited Databases
- Unlimited Connected Fields
Get started now: https://syncflow.ybouane.com/
Who benefits most from SyncFlow
- Content teams drafting in Notion who want instant publishing to Webflow.
- Agencies managing multiple client blogs with consistent design systems.
- Technical and academic publishers needing code highlighting and TeX.
- Startups building SEO engines without adding CMS admin overhead.
Resources and video tutorials
- How to sync Notion with Webflow — Full Tutorial: https://www.youtube.com/watch?v=_890vYoe3KQ
- SyncFlow — Notion-Webflow Sync (Trailer): https://www.youtube.com/watch?v=HGjBCLL3anc
Next steps: write in Notion, ship to Webflow
Turn your Notion pages into polished Webflow CMS items—automatically, reliably, and at scale. Map once, then let SyncFlow keep everything in sync so your team can focus on content and design instead of copy/paste.
Some images in this article were generated via AI tools and the article itself was proof-read with AI.